| Author | Message | ||
Jonathan Sachs Board Administrator Username: Admin Post Number: 2225 Registered: 08-2002 |
Please use this thread to post general image editing and transformation tips. Jonathan Sachs Digital Light & Color | ||
Anonymous |
OK, I'll go first here. When using USM for Local Contrast Enhancement try starting with Amt @20% and Radius @10. This will produce a very subtle change but may be all that's required for some photos. | ||
Robert W. Coutant New member Username: Couman Post Number: 19 Registered: 01-2005 |
Solid background cleanup: I was recently asked to photograph some indoor flowers. With no foam core board or other suitable backdrop available, I used some black towels as the background plus two incandescent lamps and fill flash for lighting. The result was a very hashy background that proved intractable with the Advanced Sharpen transform. However, the following worked very nicely (and quickly): 1. Make and blur a mask based on the background color – don’t worry about making it perfect as the next step will correct it. 2. Apply the high contrast transform to the mask to convert it to pure black and white. 3. Use the mask in conjunction with either the composite transform or the tint transform (with both ends of the scale set to the same color) to fill the background. | ||
den Unregistered guest |
Creating Beautiful Skies Methodology: 1. Perform initial enhancement changes in the HSL color space taking advantage of this color space’s characteristics for color to reach full saturation at 50% tones. Darkening not only increases the contrast but will also increase saturations. 2. Take advantage of a Highlight Tone Range or Density mask to quickly and smoothly isolate sky/cloud areas from other image content. Workflow [unless otherwise indicated, transform settings are the ‘program’ defaults]: 1. Open or click on an opened image file creating Image1. 2. Create a sky/cloud area Highlight Tone Range or Density mask for Image1, Mask1. See: http://www.dl-c.com/discus/messages/5234/5236.html ‘Making Complex Tone Range or Density Masks’. 3. Click on Image1, open the Color Curves transform where Input Image = Image1; Mask = Mask1; white =100, black =0, Color Space = HSL: a. In ‘L’ channel, add a curve control point at [50,50] and move to [50,40] -> [50,30]. Check for full range white and move the [100,100] to the left as needed or as wanted for creative effect. b. If the clouds have obtained unacceptable color cast, switch to the ‘S’ channel, add a curve control point to [50,50] and move it vertically downward until acceptable. c. Click OK, creating Image2. 4. Perform any other enhancements using Image2 and Mask1 [color balance/correction, additional brightness/contrast adjustments [HSV or RGB color space], etc.] as needed or desired for creative effects….. Or do away with the original sky/clouds all together and substitute different sky/clouds using the Composite transformation. Example: Original image – left; Highlight Tone Range mask – right; & Enhanced image – below. 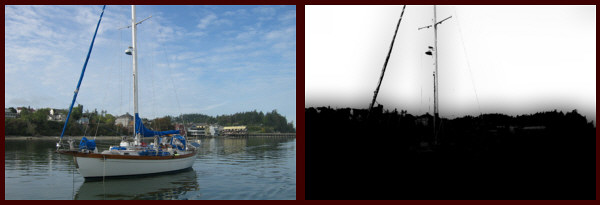 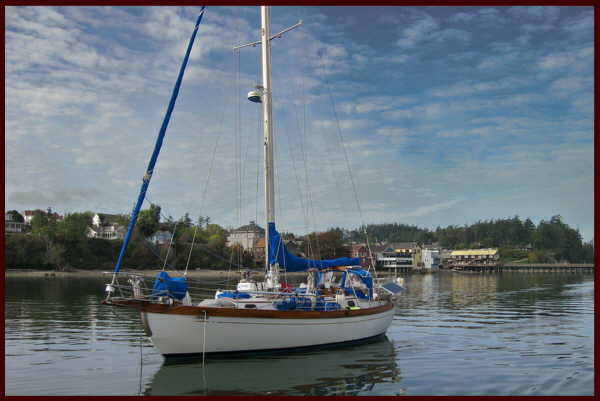 | ||
JiminMinn Unregistered guest |
I recently purchased a Zenitar fisheye for occasional use with a 1.5x magnification factor dSLR. It works nicely, and I have found PWP very easy and useful when I wish to convert to something similar to rectilinear. Besides executing the lens distortion correction, I restore compression to something close to 3 to 2 (the sensor's aspect ratio). This results in minor compression in the center and some expansion at the edges (on a landscape shot). Presumably nothing in PWP can correct this type of distortion, but are there other programs that address this issue? Thanks for your thoughts. | ||
Andy Blankertz New member Username: Ablankertz Post Number: 4 Registered: 05-2003 |
Local Contrast Enhancement Revisited Besides USM, there's another method of doing LCE which offers more flexibility and power. Step 1. do the Blur transformation using the high pass option and whatever radius you want- up to a max of 128 instead of 40. Step 2. Do a Filter transformation on the original image, using the "high passed" image as the filter and setting exposure compensation to 1.36. What really makes this method interesting is that you are not limited to using the original image as the input to the high pass step- just any image of the same dimensions. For example, to avoid the color changes that might occur, first extract the luminance channel and use the high pass version of that as the filter. You could also use one of the color channels. Another variation is to do a curves modification, which will change the relative effects of the LCE on different tonalities. | ||
Maciej Tomczak New member Username: Tomczak Post Number: 109 Registered: 08-2004 |
EDGE SHARPENING Edge sharpening is built-in in the Advanced Sharpen, but it can produce 'chiseling/pitting' artifacts. I prefer the following sharpening method (preferably applied after the noise-reduction step): 1) Detect Edges: TRANSFORMATION/SPECIAL EFFECTS/EDGE; Settings: Sobel, Compute, HSV 2) Blurr Detected Edges: TRANSFORMATION/BLUR; Settings: Gaussian, Radius=2+ set experimentally depending on image size 3) Stretch the Dynamic Range of Edges: TRANSFORMATION/GRAY/LEVELS AND COLOR: Settings: Full Range 4) Convert Edges to 8bit mask (if needed): TRANSFORMATION/CONVERT: 8bit B&W 5) Sharpen the original image with edges as mask: TRANSFORMATION/SHARPEN/UNSHARP MASK: Settings: Radius=2+ determined experimentally, Threshold=0, Amount=100% for edges - 20% for the rest of the image - experiment. | ||
Elie Dinur New member Username: Elied Post Number: 61 Registered: 07-2003 |
Maciej's edge mask can be reversed to become a surface mask. This can then be used to control noise removal. For instance, after an image has been given the NR treatment in another application, Neat Image, Noise Ninja, etc., both the original and the treated files can be opened in PWP and combined through the surface mask (Composite/Blend) in order to restrict the blurring of the NR to areas of smooth color (e.g. sky) while keeping it away from detailed areas. Elie | ||
Elie Dinur New member Username: Elied Post Number: 70 Registered: 07-2003 |
PWP 3.5.10 has added Soft Light and Hard Light options to the Composite Transformation, both of which work very well with High Pass Sharpening (as outlined in Andy Blankertz's post above). To review just briefly: 1. Blur/High Pass. Andy says to use any radius, but I've found that a high radius will cause too much contrast in the final product (highlight and shadow blocking). I like a radius of around 5. 2. Convert the filtered image to monotone. (Andy suggests doing this before the Blur Trans.) 3. Composite. The original image is the input, the result of step 2 is the overlay. I prefer Soft Light; the effect is more subtle and controlable (with the amount slider). Hard Light is too contrasty for my taste but can be tamed by decreasing the amount. One of the main advantages of High Pass Sharpening is the avoidance of haloes. Elie | ||
Winfried W. Schwolgin New member Username: Winfried Post Number: 97 Registered: 01-2004 |
Warp Transformation If you use the warp transformation for instance to correct a picture of an building, I found this litte trick helpfull to find the right setting for the proportion slider. I use the paint tool and create a big round spot on the original picture. Then I change the proportion slider until the spot is round again. After I found my setting I use "cntl z" to undo the spot. 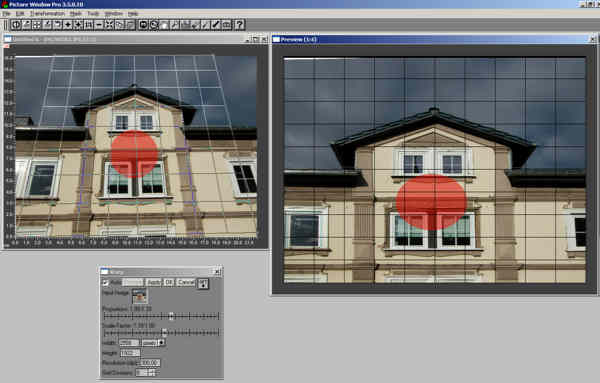 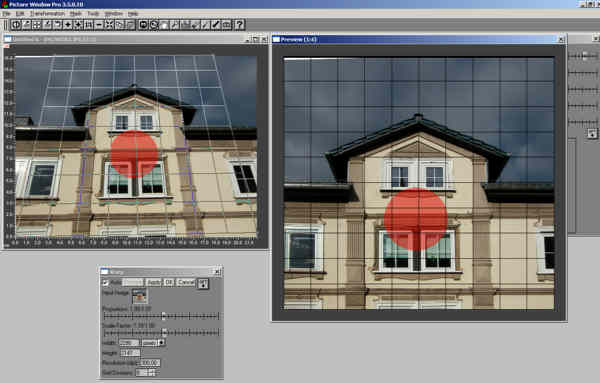 Winfried | ||
Mans Hagberg New member Username: Måns_h Post Number: 2 Registered: 02-2006 |
Pretty useful! Thank you! | ||
Robert Geilat New member Username: Grobert Post Number: 1 Registered: 05-2006 |
Hello, There is a nice article at http://www.outbackphoto.com/workflow/wf_81/essay.html about how to get the velvia touch to images. Since this technique is required to be done in LAB decompozition I would like to ask how can it be done in PWP sice it does not have LAB decompozition. Have a nice day, Robert | ||
den Member Username: Den Post Number: 22 Registered: 03-2006 |
Velvia Effect.... J Sachs quote from this thread: http://www.dl-c.com/discus/messages/2/5869.html ..."To simulate Velvia, you can just bump up saturation and increase contrast. You can do both of these with the Levels and Color transformation - just drag the black slider to the right [...this should be LEFT...] to increase contrast and this will darken shadows. Velvia also exaggerates reds, so you could use the selective color correction transformation to increase the saturation of reds as well."... | ||
Eric Vogel Member Username: Evogel Post Number: 50 Registered: 08-2005 |
Den, Is it possible to run into gamut limits doing this - or will the ICC profile (e.g. sRGB) "soft limit" Another way to ask this is (and it is just curiousity) does the gamut of Velvia fit inside sRGB? Eric | ||
Robert Geilat New member Username: Grobert Post Number: 2 Registered: 05-2006 |
Den, In the article, I pointed to, there is explanation that boosting up saturation, which is common way of saturating photos, increases impacts also lightness. Lab colorspace clearly separates color from lightness and then saturating colors is a poor color saturation. That article is about this. I tried it with gimp and the suggested way really nicely increases saturation without sideefect, making the photo very nice. Anyway thanks for the responce. | ||
den Member Username: Den Post Number: 25 Registered: 03-2006 |
RobertG... did you see this? http://www.dl-c.com/cgi-bin/discus/show.cgi?tpc=2&post=13435#POST13435 If you have further questions or comments please respond in the linked thread in the SUPPORT section of the message board rather than the TIPS section which is usually resevered for tips rather than discussions.... Just a quick comment though: PWP's default color working space is HSV [or HSL selectable] so changes to hue/saturation can easily be made independantly of the gray tones with 'pleasing results'... | ||
Lars Tore Gustavsen Member Username: Lt_gustavsen Post Number: 55 Registered: 12-2004 |
I just discovered that www.photozone.de(scroll down to distortion on this sample page) in their lenstests writes distortion correction parameters for PW. They use imatest to find them. | ||
Maciej Tomczak Member Username: Tomczak Post Number: 359 Registered: 08-2004 |
Though it doesn't come close to the sophistication of Den's masked tonal adjustment, you may consider a blunter variation of it that is quick, simple to grasp, interactive and can deal with shadows and highlights in one go (sometimes...). It more or less mimics Photoshop's Shadow and Highlights, but unlike unmasked tone curves it can separate the image by both tonal values and pixel proximity and preserve the local contrast of small patterns (blurring the mask step). Here is the recipe: 1) Open Mask tool, slide the upper endpoint of the diagonal to the left to set the tone value above which the mask will be fully white (highligths) , and lower endpoint of the diagonal to the right to set the tone below which everything will be fully black (shadows). e.g. [30 0] [70 100]). Readjust to taste (undo <--> apply). 2) Blur the mask; adjust radius. 3) With the mask tool opened, open the Brightness transformation on the original image, apply the current mask - black slider will adjust the shadows, white one highlights. Preserve Black and White in HSV colour may work. Maciej Tomczak www.phototramp.com | ||
Robert W. Coutant Member Username: Couman Post Number: 168 Registered: 01-2005 |
In an earlier thread (http://www.dl-c.com/discus/messages/2/10574.HTML), Den discussed substitution and correction of featureless gray sky backgrounds. For landscape images, however, the sky is often a major component of the overall scene, and treatment that is more aggressive may be appropriate. One easy and quite effective means for revealing and emphasizing structure in gray skies is using the equalize transformation (under special effects). The transformation should be applied using a mask – Den’s 2-tone high-level mask works fine for many cases. Use the amount slider to adjust the transformation to taste. Often, the process will also emphasize noise, but that can easily be corrected using the same mask and the 5x5 median blur transformation. The before and after example below is from a crop that has been enhanced using only the equalize transformation (@50%).  Bob C. |