| Author | Message | ||
Jonathan Sachs Board Administrator Username: Admin Post Number: 2223 Registered: 08-2002 |
Please use this thread to post tips and techniques for creating masks. Jonathan Sachs Digital Light & Color | ||
den Unregistered guest |
Making Complex Tone Range or Density Masks Reference: J Sach’s white paper “Creating and Using Masks”, page 35, ‘Creating density masks’. Tone range or density masks are a powerful way to isolate specific image areas on the basis of their gray tones for making changes to brightness, contrast, and saturation in these areas while leaving the unmasked areas unchanged. The challenge is to develop a methodology that allows for transitions between the changed and un-changed image areas that blend without objectionable auras/halos or posterization. Methodology: 1. Determine the desired tone range using the Mask tool – Brightness Curve Probe. 2. ADD the determined tone range with the Mask tool – Brightness Curve option using a 10/100 ratio curve slope for either a Highlights or Shadows, APPLY, and then apply Blur = to 25->35% of the largest masked (white) area diameter. 3. SUBSTRACT all other tone range(s) with the Mask tool – Brightness Curve option using a 20/100 ratio curve slope where possible, APPLY, apply Feather = -2, apply Blur = 1 to further soften edges, click OK creating the Mask. 4. Check/expand the Mask for “full dynamic range” using the ‘Levels & Colors’ transform. The following illustration is taken from the Reference, page 36: 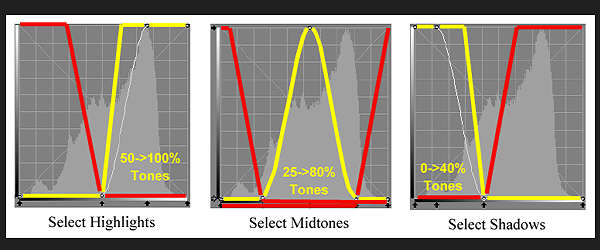 The desired tone ranges to be ADDed and their curves are indicated in yellow and the SUBTRACTed tone ranges and their curves are indicated in red. Specific Workflow steps for each of the ranges follows. Select Hightlights: 1. Open the Mask tool and in the Brightness Curve option, ADD/APPLY smooth curve = [0,0], [50,0], [60,100], [100,100] -- yellow 2. APPLY Blur = 50->100 3. SUBTRACT/APPLY smooth curve = [0,100], [30,100], [50,0], [100,0] -- red 4. APPLY Feather = -2 5. APPLY Blur =1 6. OK 7. Open ‘Levels & Colors’ transform and check/expand the mask for/to “Full Dynamic Range” Select Midtones: 1. Open the Mask tool and in the Brightness Curve option, ADD/APPLY smooth curve = [0,0], [25,0], [55,100], [80,0], [100,0] -- yellow 2. APPLY Blur = 35->65 3. SUBTRACT/APPLY smooth curve = [0,100], [5,100], [25,0], [100,0] -- red 4. SUBTRACT/APPLY smooth curve = [0,0], [80,100], [100,100] -- red 5. APPLY Feather = -2 6. APPLY Blur =1 7. OK 8. Open ‘Levels & Colors’ transform and check/expand the mask for/to “Full Dynamic Range” Select Shadows: 1. Open the Mask tool and in the Brightness Curve option, ADD/APPLY smooth curve = [0,100], [30,100], [40,0], [100,0] -- yellow 2. APPLY Blur = 15->35 3. SUBTRACT/APPLY smooth curve = [0,0], [40,0], [60,100], [100,100] -- red 4. APPLY Feather = -2 5. APPLY Blur =1 6. OK 7. Open ‘Levels & Colors’ transform and check/expand the mask for/to “Full Dynamic Range” For an actual example of a complex Highlights tone range mask, look at the top image below where it is desired to make a mask of the sky/clouds so that this area of the image could be enhanced…. Notice that there is other image content above the complex treeline that should not be part of the mask…. 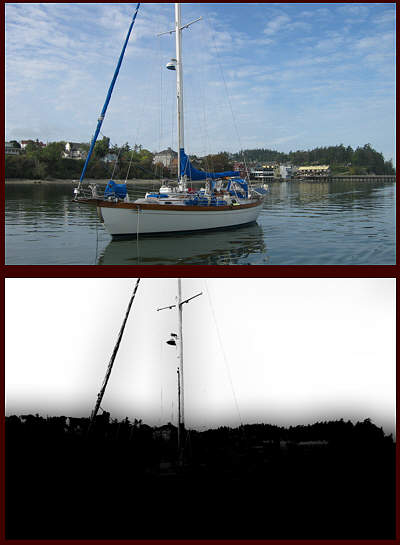 It was determined with the Mask – Brightness Curve Probe that a tone range of 65-100% was needed to isolate the sky…. The specific workflow steps were: 1. Open the Mask tool and in the Brightness Curve option, ADD/APPLY smooth curve = [0,0], [65,0], [75,100], [100,100] 2. APPLY Blur = 100 3. SUBTRACT/APPLY smooth curve = [0,100], [45,100], [65,0], [100,0] 4. APPLY Feather = -2 5. APPLY Blur =1 6. OK 7. Open ‘Levels & Colors’ transform and check/expand the mask for/to “Full Dynamic Range” Creating the mask image on the bottom – time 2->3 minutes…. Note the mask’s smooth and gradual gradient transitions of image content at and above the treeline including separation of the vessel’s mast, stays, and shrouds. The bright white right at the treeline and other anomalies are jpeg compression artifacts not present in the high resolution mask. | ||
Winfried W. Schwolgin New member Username: Winfried Post Number: 62 Registered: 01-2004 |
Part of the chapters from my book that covers masks can be downloaded from http://www.dpunkt.de/leseproben/3-89864-304-2/Kapitel-6.pdf Winfried P.S. The book and the artikel is in german. | ||
Dieter Mayr New member Username: Dieter_mayr Post Number: 17 Registered: 11-2004 |
Simpified selection of masks: If the picture is active and the masktool is active, when starting a transformation, mask is automatically active in this transformation. | ||
Robert W. Coutant New member Username: Couman Post Number: 21 Registered: 01-2005 |
Saving curves saves time: When constructing a set of gradient/density masks using the brightness curve (as in Den's tips above) click on the Opt button and save each curve. The next time you use this overall process, you can simply load the old curve and tweak it, as needed, or not for the new histogram. Note that you can save curves applied throughout PWP. It makes sense to save curves that you commonly apply with your camera system. Bob C. If someone gives a complex answer to your question, he probably doesn't know what he's talking about - H.C. Brown (1912-2004) | ||
Dieter Mayr New member Username: Dieter_mayr Post Number: 20 Registered: 11-2004 |
To create a mask without the mask tool, for text or gradients, i.e. : Select the image to be masked, File / New opens with the same pixel size then the selected image. Select Type: Black and White So a image with the exactly same size and 8 bit BW is created. When creating a Text mask, with a exact positioning of the text, select the original image as input in Text transformation, position the text, then select the mask image, and apply the text. So an exact positioning is possible. | ||
Robert W. Coutant New member Username: Couman Post Number: 24 Registered: 01-2005 |
Selective correction of over saturation: Many digital cameras (and some film setups, I’m told) tend to yield over saturated reds and yellows in images of flowers. Of course, the best solution is to compensate the exposure, but there is a simple way to alleviate the problem in post processing with PWP. Apply the Extract Channel transformation using the HSV saturation channel. This will create an 8-bit B&W in which the over saturated areas are white. The latter can then be used as a mask to gently reduce saturation in the selected areas without affecting the rest of the image. Application of a little USM, using the same mask, will then accent detail in those areas. Bob C. If someone gives a complex answer to your question, he probably doesn't know what he's talking about - H.C. Brown (1912-2004) | ||
den Unregistered guest |
HSL Saturation Contrast or Density Masks Bob C’s posted tip re saturation based image enhancements recalled to mind a previous message board thread found here: http://www.dl-c.com/discus/messages/2/2763.html that may also have application for images that have clipped RGB channels, although the Luminosity histogram shows no clipping…. Methodology: Taking advantage of the HSL color space characteristics where full saturation occurs at the 50% gray level; add and subtract 50% Gray to an image; and then take the difference. This difference image is further edited to B/W and full tonal range to become a “saturation [contrast or density] mask”. A condensed PWP Workflow: [Thanks to Bob Walker] 1. Click on the original un-enhanced image [Image1]. 2. Open Composite – Absolute Difference mode where Image1 is the Input Image at 100% and 50% Gray [click on the Overlay button, click Select Solid Color, click on 50% Gray on the color bar] is the Overlay at 100%, click OK [Image2]. Image2 should be the active window [if not click on it before proceeding to the next step]. 3. Open Color -> Saturation – HSL space, move slider to –100%, OK [Image3]. Image3 should be the active window [if not click on it before proceeding to the next step]. 4. Open Grey -> Levels and Color – HSL space, click full dynamic range, OK [Image4]. Image4 should be the active window [if not click on it before proceeding to the next step]. 5. Open Convert, select 8-bit Black and White, OK [Image5]. Image5 is the Saturation Contrast or Density Mask. Reminder: This is a HSL color space based image technique, so remember to change from PWP’s HSV default color space to HSL when making and initially using this HSL based mask. If desired results are not achieved, than switch to another color space. Examples: 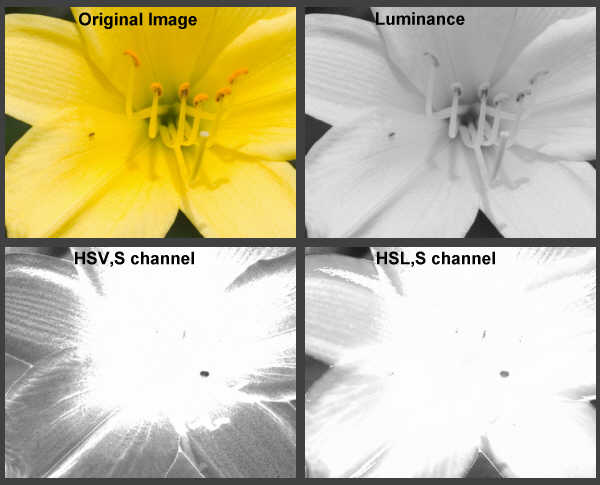 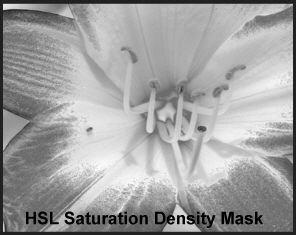 The richness of detail present in the HSL Saturation Density Mask of an image’s high saturation areas [white] may help provide additional control over subtle saturation and hue enhancements than may be possible with HSV,S or HSL,S channel based masks alone. |