Page 1 of 1
Blur transformation ver 8 vs 7
Posted: December 22nd, 2024, 12:56 pm
by repatterson
I am a long-time user of Picture Window versions up through 7, but only recently have been making an effort to move to version 8. One thing I can't find is the Tools... Miscellaneous... Blur transformation that was in version 7. This allowed me to easily blur selective portions of the background, simulating what I might have gotten if I had shot the photo with a wider aperture (giving more selective focus). In version 8, I only see a Transformation... Blur command that wants to blur the entire photo. I suppose I could create a mask, but that would be much more time consuming than what I am used to doing in version 7. Is there a simple way to do what I want in version 8? Thank you.
Re: Blur transformation ver 8 vs 7
Posted: December 22nd, 2024, 1:33 pm
by jsachs
There is no direct equivalent of the Blur tool from PWP 7 in PWP 8.
There are a couple of easy ways to can get the same effect however using the Blur transformation with a mask, which does not need to be a complicated process at all.
1) Launch the Gaussian Blur transformation and click on the white box in the Amount control and select New Mask.
a) In the Mask dialog box use the Mask Brush tool to paint the area you want to blur.
or
b) In the Mask dialog box use the Freehand Mask tool to approximately encircle the areas you want to blur. Then Select the Mask Blur tool and adjust the blur radius slider to soften the edges of the mask.
Using a mask has the advantage over the PWP 7 Blur tool that you can increase or decrease the amount of blur after specifying the area to blur or go back and refine the mask, for example by excluding areas that are a different color or brightness than the subject.
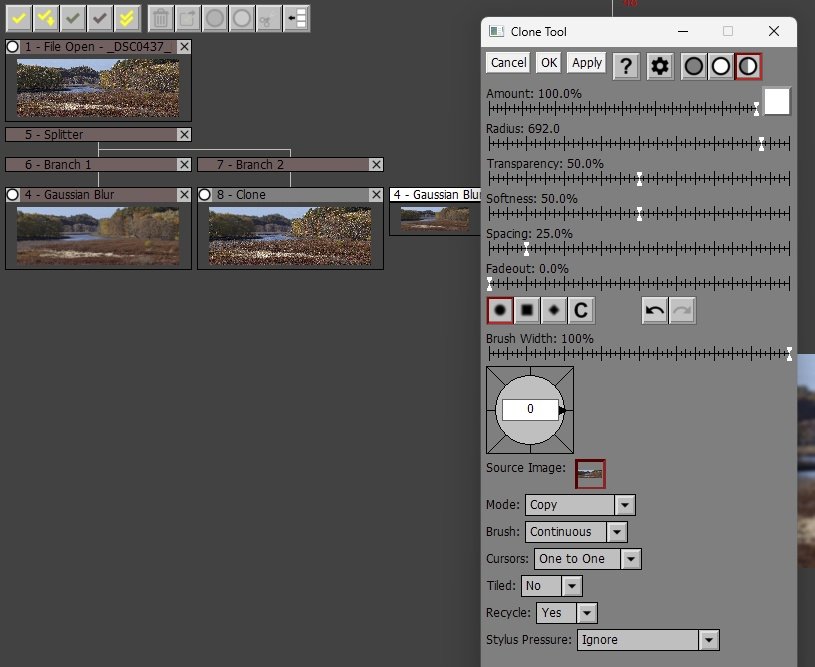
If you really don't want to use masks, there is another technique you can use. First blur the entire image. Then use the Clone tool with Cursors set to One to One to clone the blurred image over the parts of the original image that you want to blur. To get this to work, you need to insert a splitter after the image you want to blur so you can blur one branch and then clone from the blurred image to the original in the other branch. To add a splitter, just right click on the image you want to add a splitter after and select Add Splitter After from the menu. To Clone from one image to another, in the Clone dialog box, set the Source Image to the image you want to clone from and set Cursors to One to One. Then shift-click on the source image and you can click and drag on the output image.

- ss.jpg (76.44 KiB) Viewed 2749 times
If you want to do a really refined version of blurring the background behind a subject, take a look at the Precise Gaussian transformation.
Re: Blur transformation ver 8 vs 7
Posted: February 3rd, 2025, 11:55 am
by jsachs
For the next release, I added a Blur tool similar to PWP 8 similar to the one in PWP 7.