Page 1 of 2
Reducing haze or mist using PWP
Posted: October 15th, 2016, 1:32 pm
by mark_hay
Hi All
- what PWP steps could be used please on photos which have mild amounts of haze or mist to make the scene a bit sharper? (I am using RAW followed by processing in Canon DPP software.)
- I am aware that Canon software (DPP) offers Picture Styles - one of which is called "Clear" - it seems to increase contrast dramatically/too much to remove mist nicely.
- I have included small jpegs for Clear and Neutral picturestyles.
Thanks, Mark.
- More detail from Canon on Picturestyles is available here
http://www.canon.co.jp/imaging/pictures ... clear.html )
- There is also mention of Adobe Light Room having Dehaze feature -
https://helpx.adobe.com/lightroom/how-t ... ehaze.html
Re: Reducing haze or mist using PWP
Posted: October 15th, 2016, 3:56 pm
by jsachs
Several programs have recently come out with a dehaze feature - I have used the one in Lightroom and also the similar Clear View feature in DxO Optics. The two of them work somewhat differently from each other and seem to produce unnatural-looking results a lot of the time, especially if you apply them heavily. There is an extensive literature on this topic, but I have yet to see an algorithm that is reasonably easy to implement and that does not produce artifacts in one situation or another. There is no straightforward way to do this with Picture Window's existing commands since a correct implementation involves determining a depth map of the scene and figuring out what color the haze is and how it builds up with distance. All of the algorithms amplify noise, saturation and contrast in areas where there is a lot of haze since you are subtracting off the haze color and then scaling the result up to recover the scene brightness. To get around this problem, they usually stop trying to remove haze when it gets too thick. There are also problems when a nearby object such as a tree overlaps distant objects since the haze removal must be applied differently based on the distance and it is tricky to create an accurate enough distance map. Scenes where the depth increases gradually are easier to correct. I played with some code briefly, but it looked like it was going to be a lot of work to get something that well all the time.
Re: Reducing haze or mist using PWP
Posted: October 15th, 2016, 4:25 pm
by ksinkel
I tried to reproduce the anti-haze filter using PWP Brightness curve and saturation. It's not an exact match, but I think it is instructive.
First I loaded your before image and brought up the brightness curve. Notice that the histogram is zero at the very extreme left. This means that there are essentially no blacks -- your blackest areas are actually a dark gray. This reads as haze in the photograph. To correct this, just move the left point of the histogram to where the blacks start. (I also made a similar adjustment at the white end.)
Your image is also low contrast. You can increase apparent contrast by applying the S-curve. The tradeoff is that you will lose shadow and highlight detail. And in fact your output image loses all detail in the shadow areas. How much shadow detail you are willing to lose for improved contrast is a creative choice and depends on the image. I adjusted the curve to match the Nikon results as closely as possible. However I think if this were my image, I would back off a little bit to show more detail in the shadows.
Finally I also boosted the saturation by about 20%.
Here is the histogram and my final image:
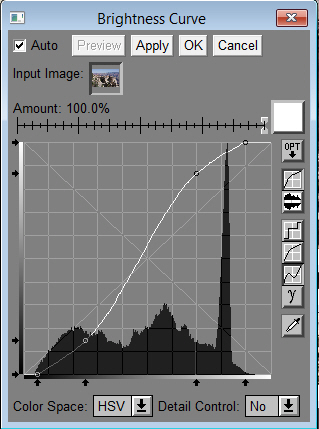
- 20140804_Curve.jpg (82.54 KiB) Viewed 13647 times

- 20140804_Curve.jpg (82.54 KiB) Viewed 13647 times
Re: Reducing haze or mist using PWP
Posted: October 15th, 2016, 5:42 pm
by den
...
Perhaps this approach will help achieve a preference PWP Composite-Blend of an overly dramatic image version [high contrast] with its more natural verson [normal contrast] where:
Img1 = IMG_2551neutral.jpg
Img2 = IMG_2551clear.jpg
Step1: lower-left Apply Add a Mask-BrightnessCurve StepStair: 0-0, 50-0, 50-100, 100-100; to Img1 and leave the Mask Tool 'active' [do not close]...
Step2: open the Composite-Blend transform where Input = Img1 and Input Amount Mask = the 'active' mask of Step1; Overlay = Img2... ...Note: to make the posted images 1:1 register, a 4-point Alignment was used as Img1 and Img2 had differring pixel dimensions but essentially identical scene content...
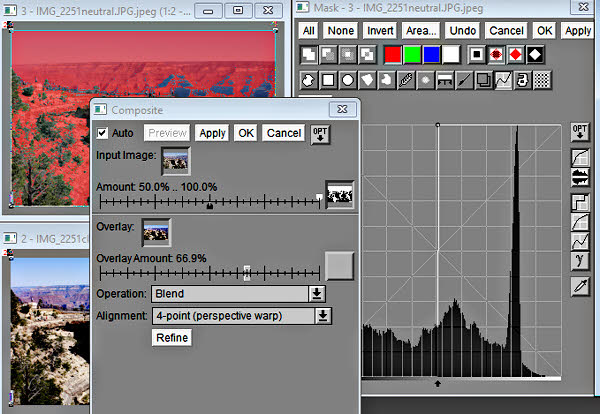
- ScrnVw_1_Composite-Blend_with_Mask.jpg (77.72 KiB) Viewed 13630 times
Step3: adjust Input Amount Mask black and white and Overlay Amount sliders to preference while monitoring an updating Preview... ...click OK or Apply... ...OK or Close the Mask Tool...
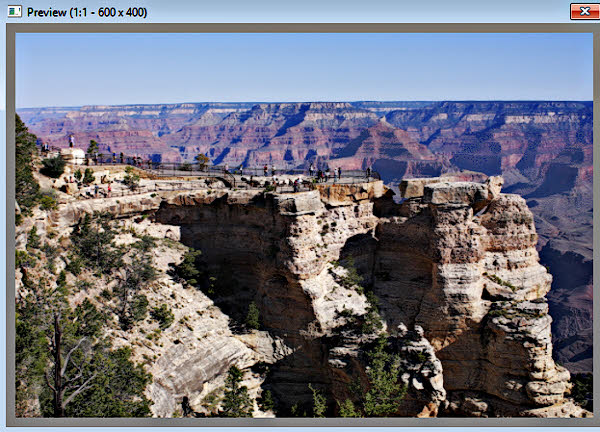
- ScrnVw_2_resulting_Preview.jpg (96.05 KiB) Viewed 13630 times
This is an adaptation of the theory/discussion described in the Tips Section here:
http://www.dl-c.com/board/viewtopic.php?f=5&t=1020
...have fun...
...den...
Re: Reducing haze or mist using PWP
Posted: October 16th, 2016, 8:31 am
by MarkT
I've had some success with foggy, hazy images by using the Filter Transformation:
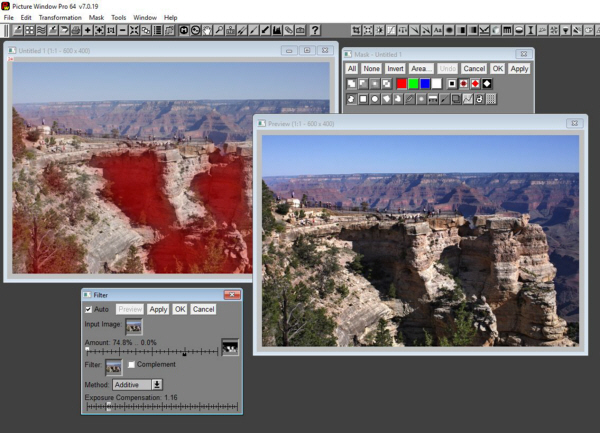
- filter_operation-1.jpg (179.17 KiB) Viewed 13580 times
Basically filter the image with itself, and use a mask, if necessary, to preserve some details from the original.
Re: Reducing haze or mist using PWP
Posted: October 16th, 2016, 2:39 pm
by den
...
Yet another possibility using a favored nature Landscape
USM Local Contrast Enhance transform to: (1) enhance large radius major edges; (2) control transform Amounts applied above and below 50% HSV-V tones; and
importantly (3) limit Local Contrast Enhancement primarily to the 'dark' half of edges without generating 'white' half halos...
The suggested transform settings and mask [a Blur=2 was added following the applied curve (shown)]...

- IMG_2551neutral_USM-LCE_transform-mask.jpg (89.42 KiB) Viewed 13546 times
The resulting Preview with added small detail Sharpening and slight increase in HSV-S saturation...
- IMG_2551neutral_USM-LCE_Preview.jpg (96.95 KiB) Viewed 13540 times
Just exploring possibilities...
...den...
Re: Reducing haze or mist using PWP
Posted: November 17th, 2016, 7:28 am
by JenniferB
In a hazy picture the red channel often contains the most detail, so I created this version by replacing the HSL L channel with the red channel. (Specifically, by using Color->Extract Channels to get R, H, and S followed by Gray->Combine Channels.) It isn't meant to be a final version, just a better place to start your adjustments from.
Re: Reducing haze or mist using PWP
Posted: November 28th, 2016, 9:38 pm
by Robert Schleif
JenniferB's method works because the longer wavelengths of red light are less scattered by the particles in the haze than the blue wavelengths. This is the reason that red filters reduce haze in black and white photography. Replacing the intensity channel with the red channel works both in HSV and HSL with very little difference in the result.
Re: Reducing haze or mist using PWP
Posted: February 12th, 2017, 6:20 pm
by mark_hay
I would like to thank everyone for their help.
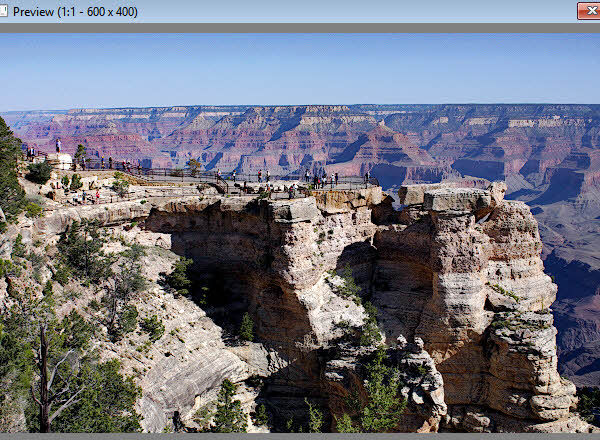
At last I had some free time and I have used the method provided by Jennifer and got pleasing results of the Grand Canyon with reduced haze.
This was by using Color->Extract Channels to get R, H, and S followed by Gray->Combine Channels.
(I did find that I needed to be in 24bit color to do this - using 48 bit color resulted in some extreme colors arising.)
Thanks, Mark.
Re: Reducing haze or mist using PWP
Posted: February 13th, 2017, 9:48 am
by doug
Finally! A new post that relates to using PWP to solve particular image adjustment issues and not its new status as freeware.
I am retired (10 years now), but not yet dead. Similarly PWP may be entering a well deserved retirement phase. But it too is far from dead.
After getting used to and appreciating it's "under the hood" (as DEN has put it) approach, I intend to use it as my go-to editor for a long time. Friends, I hope we can keep this board and the sharing of questions and tips as active as in the past.
Doug Haag