Page 2 of 2

Re: ...Customized Light Beams?...

Posted: September 6th, 2012, 5:00 am
by Dieter Mayr
Andrew, nice idea with the polygon mask.
I have followed this tread and have made some tries with the line tool to create the rays, then blurring like you do, but did not find the time to formulate it tutorial like to post it here, i planned to do this in the next days.
Your way is far more elegant then mine, you can draw directly over the image with mask.

Re: ...Customized Light Beams?...

Posted: September 6th, 2012, 8:12 pm
by den
The following is a re-post of ..."artifex 's [Andrew's] on September 4th, 2012, 10:59 am" suggested workflow with the missing illustrations. The original posting is to be found here: http://www.dl-c.com/board/viewtopic.php?f=4&t=660#p3362
----------------------------------------------------------------------------------------------------------------------------------------------
I tested several workflows starting from the suggestions but finally returned to a more prosaic unfolding and what follows appears (it is a personal taste) best to correspond to than I sought.

First method:
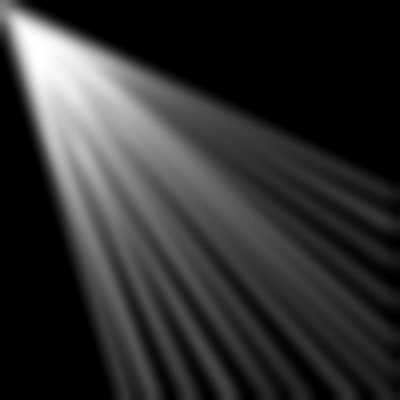
mask3.jpg
mask3.jpg (20.22 KiB) Viewed 4314 times
Step1:
a) Open an image on which apply the light beam.
b) Open Mask - New - Polygon.
c) Place one of the initial control points towards where the light comes, for example, the left top corner, and even beyond. Draw the opposite corner in the opposite angle and the two other points on each adjacent dimensions, according to the light desired angle.
d) Place control points all the way along these, with dimensions according to the distribution: 2 points closer, 1 spaced point, 2 closer points, 1 spaced point, and so on. One must have two points closer at each end. The closer points must be separate by 25 to 30 pixels to avoid artefacts which I saw appearing when these points are not doubled or if they are too much closer.
e) Draw on the spaced points in the direction of the origin point from the rays, according to the following diagram, without never the lines are touching nor cutting. When the rays appear well distributed, Apply creating Mask1.
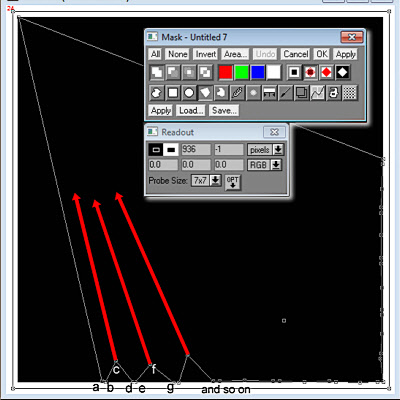
Step1.jpg
Step1.jpg (47.07 KiB) Viewed 4310 times
Step2:
Click on Mask1. Open Blur Transformation - Gaussian
Radius = 15 to 25 according to the thickness of the rays
Threshold = 90 to 100 to avoid artefacts.
OK Creating Mask2

Step3:
Click on Mask2 - Open Gradient Transformation
Level = 30 to 40
Type = Multipoint
Operation = Filter
Color = black or color of choice.
Move the four control points to obtain the desired gradient (position and intensity).
OK creating Mask3
Possibly, extend to full dynamic range.

Second method (Faster):
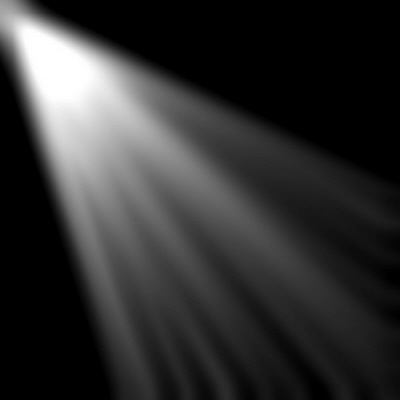
mask2b.jpg
mask2b.jpg (17.22 KiB) Viewed 4323 times
The first step is the same than the first method, but without leaving the masks Tool, after having drawn the mask of beams,
Step 2b : Do Feather= 25, Apply, then Blur = 5 to 10, and Apply; OK creating Mask2b.

…ask if there are questions…as would say Den…

Andrew

Re: ...Customized Light Beams?...

Posted: September 7th, 2012, 10:16 am
by artifex
Den,
All my thanks to have finished my post.
I am in the preparation of a photographic exhibition at the end of the next week and I’m a little the “head in the bag”.
All these photographs were prepared with PWP by following the hints and the advice discussed on the forum. For that also, thank you Den, Jonathan, Kiril, BoB C and W; Dieter, Elie, Tony G., Kevin, etc....

Andrew

Custom Light Beams and other Textures

Posted: October 15th, 2012, 4:50 pm
by den
The following may be of interest as an example of using other types of texture images as well as 'beams'...

...my wife and niece recently returned from a visit to southwest USA's 'canyon country' with the obligatory 'olde time western' staged saloon studio tourist [and pricey] digital print produced with rudimentary post-processing software...

(1) the print was scanned, then adjusted for full range, contrast, and color...
Img1.jpg
Img1.jpg (47 KiB) Viewed 4191 times
(2) the resulting (1) image was depth-mapped guassian blurred and grain added...
Img2.jpg
Img2.jpg (20.57 KiB) Viewed 4167 times
(3) the resulting (2) image was Hard Light filter blended with the alternate suggested 'Customized Light Beams' template that had been Composite-Blended with DieterM's sky/cloud texture where Color 1 was changed to a 25% Gray [see: http://www.dl-c.com/cgi-bin/discus/show ... #POST28665].
Img3.jpg
Img3.jpg (47.33 KiB) Viewed 4188 times
This texture template is available for download at http://www.ncplus.net/~birchbay/tutoria ... eams01.htm if of interest...

Post 1 of 2 -- to be continued...

Custom Light Beams and other Textures

Posted: October 15th, 2012, 4:55 pm
by den
Post 2 of 2 -- continuation...

(4) the main subjects of the resulting (1) image were one-to-one cloned into the resulting (3) image version, producing...
Img4.jpg
Img4.jpg (47.98 KiB) Viewed 4271 times
...to me this image version has a greater sense of depth, varied lighting, and suggests the uneven fading and grain that an 'old' photograph might exhibit... ...perhaps a more interesting image than was originally purchased... ...and exploring possibilities

As always, ask if there are questions...

...den...

P.S.... another possible image suggesting sun and foggy mists resulting from the use of the 'SkyClouds_Beams' texture image Composite-Hard Light filtered with its original:
Sandhill_Cranes_120206.jpg
Sandhill_Cranes_120206.jpg (45.87 KiB) Viewed 4172 times