| use arrows to turn the pages. |
Once a mask is made, you are ready to combine the two images. With one image selected as the “Input Image”, clicking the Composite transformation tool will show the following desktop . . .
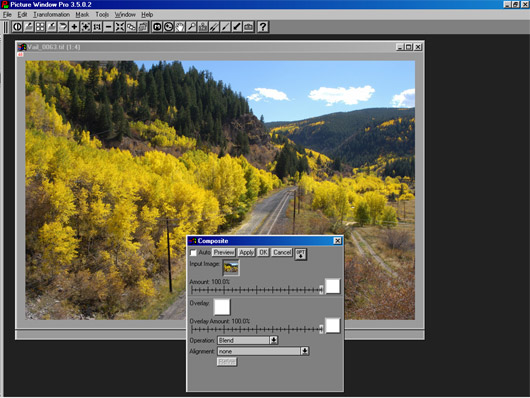
Here we see the light image as the Input Image and no images selected for the Overlay or Amount Masks. Remember, you need to have any window you wish to use for a mask or for the overlay opened on the desktop in order for it to show up in the selection list when you click the mask or overlay button. In this case, both the mask made above and the dark image were open, so they may be selected by the appropriate buttons as shown below . . .
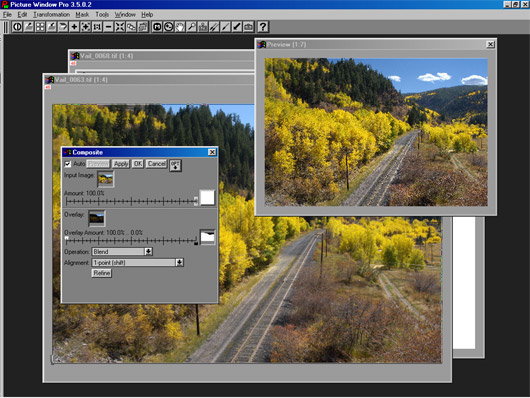
The Amount Mask was selected for the Overlay image rather than for the Input Image so that the sky area of the darker image will be “on top” of the Input Image. We need this so that the images can be shifted to cover the difference in the framing of the two images. Note that the black Overlay Amount slider was moved to 100% and the white slider moved to 0%. Also, the Alignment window has been changed from “None” to 1-point (shift)”. This will show handles on the Input Image as can be seen in the lower left corner of the image above. This allows the offset of the two images to be adjusted by moving one relative to the other.
It is best to select “Auto” preview and enlarge the preview image (use the + button after selecting the preview window) to 1:1 or even 2:1 so you can see the “edge” where the two images are overlapping. When the alignment is good, click OK in the Composite window and a new window will be created with the combined images . . .
| use arrows to turn the pages. |