| Author | Message | ||
Robert W. Coutant New member Username: Couman Post Number: 89 Registered: 01-2005 |
Frames and mattes are probably most relevant to prints (check out DL&C’s home page for new software in this area), but they are also of interest for onscreen presentation of images. The use of a drop shadow plus a border is probably most common, but many different styles are used. In experimenting with different styles, I stumbled onto two interesting approaches that I have not seen mentioned elsewhere: A. Using a Gaussian blur plus the emboss transformation 1. Add a white (or other light color) border to the original image. The width should be 0.25 to 0.5 percent of the original image width, with the ratio of top and bottom to left and right sides being consistent with the aspect ratio of the original image. 2. Add a darker border about twice as wide as the first, again paying attention to aspect ratio (Image 2). 3. Generate a new 8-bit image the size of the original image specifying black as the fill. Add white and black borders to correspond with the dimensions of the borders applied to form Image 2. This image is then the mask to be used with the following operations. 4. Apply a Gaussian blur (using the mask) to the light border of Image 2 using a radius of the same order of magnitude as the border width. This will have the effect of drawing out color from both local areas of the original image and the outer border, while leaving the edges sharp. Experiment with the radius to get a pleasing blend of colors. 5. Emboss the image from step 4 using the same mask. Increase both the radius and height from the default settings to increase the contrast along the edges of the border. (Experiment with the settings to optimize the effect for a particular image.) This will cause the image to appear elevated over the soft color gradations of the inner border. B. Using the gradient transformation 1. Paying attention to the aspect ratio of the image, add a light colored (use white the first time you try it) border. 2. Open the gradient transformation; switch to the curve mode; select rectangular geometry; and add control points as shown in the screenshot below. 3. Switch from fill to filter mode to see how the resulting pattern fits your image, and then adjust the control points accordingly. A soft diffuse area is produced by a broad shallow area in the curve; a deep and steep curve segment will produce a sharply defined dark area. 4. Once you have defined a complex curve that you like, you can save it for future use. [It will automatically fit any image size.] The pattern generated by the curve can be applied directly in filter mode or it can be output as a mask in the fill mode. Note that the start and end colors for the curve can be selected. 5. For multiple colors, use the linear mode – the linear mode gives more varied color control, while the curve mode gives more precise control over density and gradients. 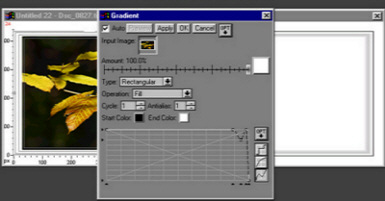 Bob C. |