| Author | Message | ||
Jonathan Sachs Board Administrator Username: Admin Post Number: 2226 Registered: 08-2002 |
Please use this section to post tips or techniques for creating special effects - for example simulating water colors or distorting images. Jonathan Sachs Digital Light & Color | ||
den Unregistered guest |
Glow or Glamour Effect [Tarlika Elizabeth Schmitz of Scotland originally posted this effect. http://www.dl-c.com/discus/messages/2/2224.html ] Methodology: An image is twice brightened in RGB color space by 15% each time. The 1st brightened image is then filtered using a blurred version of the 2nd brightened image as the filter. Applications: (1) uniformly de-emphasizes blemishes/wrinkles in skin areas for portraits; (2) provides a global ethereal quality to an image sometimes called "glamour"; and provides uniquely de-emphasized background when main subject areas in an image are protected from the effect by a mask and/or cloned into the 'glow' image from the original. Workflow [unless otherwise indicated, transform settings are the 'program' defaults]: 1. Open or click on an opened image file creating Image1. 2. Open the Brightness Curve transform; select the RGB color space; add a curve control point by mouse-pointer Shift-click at [50,65]; click APPLY creating Image2. 3. Click on Brightness Curve transform Input Image box and select Image2, click OK creating Image3. 4. Click on Image3, open the Blur transform, select 'Gaussian' Method with Radius = 20; click OK creating Image4. 5. Click on Image2, open the Filter transform where Input Image = Image2, Filter = Image4, Method = additive, Exp Comp = 1.00 or adjusted to suit, click OK creating Image5... the "Glow Effect" image. Note: For Step 5, the Composite - Filter transform could also be used, however, with the Filter transform, its Amount and ExpoComp settings will provide some adjustment for saturation, contrast, and brightness without using a subsequent transform. Glow Examples - Original - left --- Glow - right: 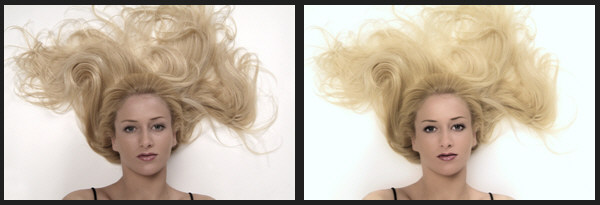 Model's eyes, brows, and mouth cloned from Original into the 'Glow' image. 'Glow' image further color balanced and brightened to preferences. 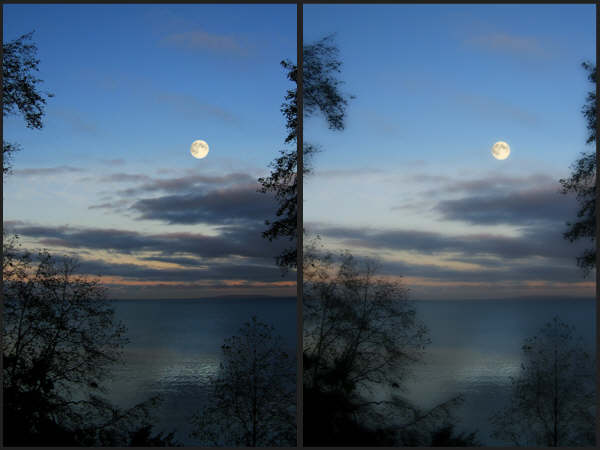 Moon cloned from Original into 'Glow' image. This technique can also be used for skin smoothing when limited to skin image areas: 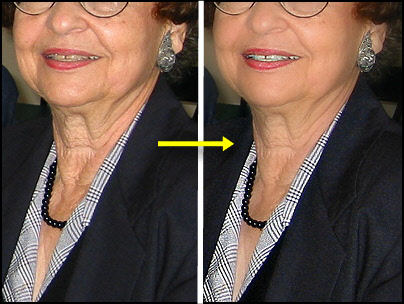 | ||
Robert W. Coutant New member Username: Couman Post Number: 46 Registered: 01-2005 |
Ghosting Ghosting, the seamless insertion of a partially transparent image, has become a popular "trick" for Photoshop (PS) users. The PS action is relatively complicated with 8-10 steps involving multiple mask layers, brushes, and opacity adjustments. As is frequently the case, I have found that the same effect can be accomplished in fewer steps with PWP: 1. Prepare the insert by cropping and resizing. I use an oval crop to correspond with step 3 below. 2. Mask the portions of the insert that you do not want to include. (Invert if necessary) 3. Apply an oval gradient to the mask, using the subtractive filter option and a 3rd color control point to adjust the density and expanse of the gradient. 4. Blend the insert with the target image using composite transform and the gradient mask. Use the black amount slider to control the final density, and set the white slider to zero. Use the alignment point option to adjust the position of the insert. Bob C. If someone gives a complex answer to your question, he probably doesn't know what he's talking about - H.C. Brown (1912-2004) | ||
Isaac Chavel New member Username: Isaac Post Number: 1 Registered: 03-2006 |
The "Glow" technique applied to backlighting of fall colors though the leaves.  This approach is out of favor since the pictorialists (I guess), but here, after I tried it, it seemed to capture the effect/experience of the backlighting. Thanks to Den for posting the method. Note: Poster's images are not available -- Administrator 06/18/2017 |