| Author | Message | ||
Jonathan Sachs Board Administrator Username: Admin Post Number: 2224 Registered: 08-2002 |
Please use this thread to post retouching tips or techniques. Jonathan Sachs Digital Light & Color | ||
Kevin Elliott New member Username: Kevgermany Post Number: 54 Registered: 09-2004 |
Situation orten arises when you need to ensure that specific colours are consistent from one image to another in a series (e.g. wedding shots). Skin tones, dress colours etc. These often vary due to exposure and lighting differences. Spend some time getting a master correct with the key colours. In the colour correction transform, after resetting click a few times on each key colour area, this will produce clusters of points for each key colour. Save this as a reference. For each subsequent image load the reference then click in the different colour areas. If they don't match the reference, shift click on the offending points and draw an arrow into the middle of the target points from the reference. It's also possible to sample a specific colour from another open image, not just the one that you're working on. A similar technique can be applied to the gray/brightness curves transform. | ||
Kevin Elliott New member Username: Kevgermany Post Number: 122 Registered: 09-2004 |
Correction to previous post, it's not shift click, but just click... | ||
Kevin Elliott New member Username: Kevgermany Post Number: 123 Registered: 09-2004 |
Selective colour enhancement: Increasing saturation affects the whole image, unless masks are used. It's possible to strengthen specific colours without masking if the image suits it. e.g. a sunset where the image has slightly understated colours. Select the image, then use the colour correction transform. For each colour to adjust, click on it in the original, then click on it in the dialogue and draw a small arrow from the newly created point along an imaginary line drawn between the white centre point through the newly created point towards the edge. Normally only a small movement is needed to increase saturation. Adjust the brightness of individual points as necessary. Great for enhancing washed out sunsets. | ||
den Member Username: Den Post Number: 31 Registered: 03-2006 |
Flash Shine softening/removal Use a few clicks of a high transparent, soft-sided Speck Removal tool brush with varying radius: 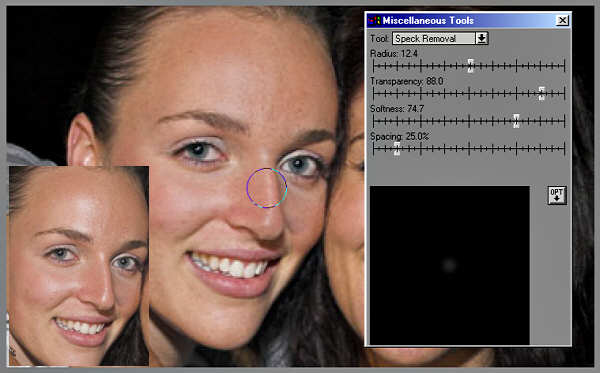 | ||
den Member Username: Den Post Number: 38 Registered: 03-2006 |
Flash Shine Removal/Softening II Add'l considerations: 1. The Speck Removal tool radius should be large enough to include good skin tones. 2. Be sure to 'click' rather than 'drag' the tool brush. 3. In severe applications, the applied image area tends to loose contrast and posterize... this sometimes can be compensated with the 'ADD Noise' tool, set with a large soft radius and 99% transparency... ...Again, 'click' rather than 'drag'... | ||
Maciej Tomczak Member Username: Tomczak Post Number: 414 Registered: 08-2004 |
Single-channel Cloning/Retouching I suggested some time ago that it would be useful for a clone tool could have an option on cloning, say, V-channel only. It's not the same, but doing that is sometimes closer to 'healing'. It's quite easy to do that already: 1) Extract 3 channels (e.g. H,S and V; when choosing first two channels, hit Apply, than OK for the third one - this way we get 3 of them extracted in one go) 2) Combine the same three channels, check Auto Preview, then do cloning or some other retouching on the channel of your choice, monitoring the Combine Channels preview. It's a wrong section for it, but it would be really nice if the extracted channels were labelled (e.g. Untitled 13_HSV-V, Untitled 15_RGB-G etc...) - it's really easy to get lost when working with many channel windows. Cheers. Maciej Tomczak www.phototramp.com | ||
den Member Username: Den Post Number: 374 Registered: 03-2006 |
. . .Reducing flash glare from eye glasses. . . While retouching some kodacolor 'slide' scans before making 4x6 inch 'snap shot' style prints for my wife's scrap/photo album... I had an opportunity to refine a technique that reduces flash glare from eye glasses that might be useful for others: Step1: make a 'mirror image' version of the 'starting image'. Step2: Composite-Blend the 'starting image' with the 'mirror image' as the Overlay. Initially leave the Overlay Amount at 100%. Set Alignment to "2-point (shift/rotate/scale)". Move alignment Points 1 and 2 for both the Input and Overlay images to the upper left and right corners of the eye glasses frame. Monitor Preview. Change the Overlay Amount to 50% and manually refine Points 1 and 2 locations so that the 'starting image' glare is overlaid closely with near matching glare-free area of the 'mirror image'. Re-set the Overlay Amount to 100%. Click OK. 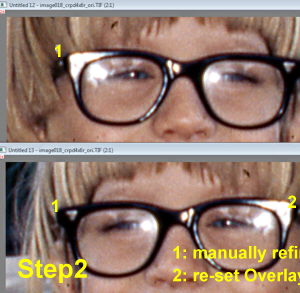 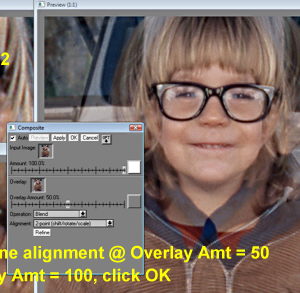 Comment: the 'resulting Step2 image': (1) will be registered with the 'starting image' to facilitate 'one to one' or 'linked' cloning and (2) although 'mirror'-ed, the eyes/eye glass frames will have essentially the same spacing/dimensions and angle as the 'starting image'. For moderate to strong, front to rear displacement of the eye glass frame corners, "3-point (shift/rotate/scale/shear)" alignment could be similarily used in Step2. Step3: "One to One" or "Linked" clone from the 'resulting Step2 image' into the 'starting image' with a soft sided brush of varying radius/transparency, glare-free image areas over the glared image areas. Further retouch with Misc Tools as necessary. Clone and/or Misc Tools brush 'Stamping' [multiple mouse left clicks] is often more effective than brush 'Painting' [mouse left click-hold-drag]. 'Starting image'__________________________'resulting Step3 image' 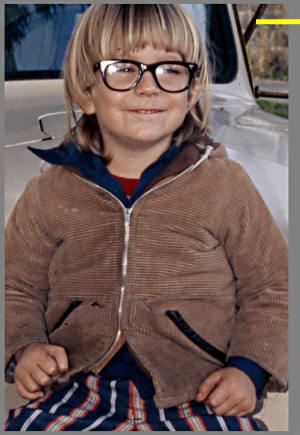  Just having some PWP fun on a rainy afternoon! |