| Author | Message | ||
Bob Walker Member Username: Rwalkernm Post Number: 71 Registered: 06-2004 |
Picture Window Users, I added a tutorial that describes how you can use Picture Window to identify hot/stuck pixels, mask them, and clean up images. The tutorial is at http://www.pbase.com/rwalkernm/hotpixels The snapshot below shows the before/after for a magnified view of one of the stuck pixels: 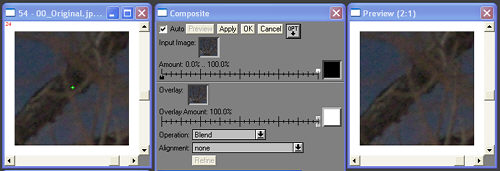 It is a two-step process. The first step is done once only -- to create a mask of your hot pixels, and the second step is to apply it to any/all images you want to clean up. My camera is old, and it has hundreds of stuck pixels, so the mask-creation process avoids me having to manually scan through the image and select stuck pixels. Both the creation of the mask and and cleaning up of the images use the composite transform, and so for the moment, this is not a candidate for an automated workflow. Let me know if you have any suggestions how to improve this workflow, or to improve its presentation. Thanks, Bob Walker | ||
Kevin Elliott Member Username: Kevgermany Post Number: 484 Registered: 09-2004 |
Bob, I like the method. Some comments (and I think a PWP bug). I downloaded the images to play. I think you can streamline things a litle. 1- immediately after creating the average of the 4 dark shots (dark frame) I think you can go straight to the mask by using the grey brightness curve (or colour curve) in high expansion with a setting of [0,0] [35,0] [35,100] [100,100]. (i.e. a vertical transition from black to white.) Doing it this way I came up with a couple more stuck pixels that didn't seem to be as bad as some, beauty of your method is that the extra stuck pixels won't mess up the final result. You still need to convert this output to 8bit b&w, though. 2- It may be possible to avoid the 4 way blend for the dark mask by using the same technique, but I didn't try that. 3- Should be possible to reduce a couple of other steps as well. In the composite transform input image like yours, overlay blurred version, but mask both images. Set input image to 100% black, 0% white, overlay to 0% black, 100% white, however on my copy the overlay sliders don't work on the base image in composite. They don't appear to be working in the overlay image either, but I can't think of a good way to prove this. I'm guessing that you need to apply the blurred image twice because the mask amount sliders aren't working in the composite transform. 4- I think feathering the mask may give halo´s at some point, not too sure. I also think the step feather is actually doing nothing on a small point like this. However if you create the blurred image by using a single gaussian blur (instead of median) with a 5 pixel radius, then follow the technique above in 3 I think you can avoid feathering the mask. (When the transform is fixed.... ) Could avoid the double masking in my 3 if there was an overlay option in the operation box - then just overlay through a mask , no need for the mask on the original. | ||
Bob Walker Member Username: Rwalkernm Post Number: 72 Registered: 06-2004 |
Kevin, Thanks for the feedback. Some comments on each of your commments follow. Excuse me for being so long-winded. 1 -- You suggest bypassing the median-blur and absolute difference steps on the averaged dark frame. You are correct, you can (almost) get to the same hot pixel mask with a single brightness curve transform, even on a single dark frame image. The tedious extra steps I took were designed to improve the contrast between the hot pixels and their background before I applied the brightness curve. When I started this "project", I thought I could isolate hot pixels using an absolute difference transform between the original image (here, the tree at night) and its twice-median-blurred self. As an exercise, you should try that, it works pretty well, but tends to be sensitive to edges in the image, so I eventually decided to work with dark frames, because a dark frame should not have any edges. My first (but now abandoned) approach works very well indeed in regions of the original image that have little detail. I tried your suggestion, namely doing a brightness curve transform on a single dark frame, and the result (after conversion to B&W) is good enough. I think the median-blurred absolute difference technique is probably more robust, so I will not forget it. The first (abandoned) method will work using any underexposed highly blurred image in place of the dark frame, because the median blurring will "level the background" and make the brightness transform effective in separating the background from the hot pixels. Your suggestion should always work if you take the time to make a dark frame. 2 -- You suggest that a single dark frame will work, avoiding the averaging step using the stack images transform. I think that works too. The averaging of several dark frames was an instinctive attempt to further reduce the background noise. There is, as you have noted, probably enough contrast already, if we start with a dark frame. The astrophotography community likes to average dark frames, and I was just trying to follow their form. 3 -- You suggest doing the final composite transform differently. I am confused here. You must have a better understanding than I do of what the b&w sliders do on the input and overlay images in the composite transform with masks present everywhere. I am trying to figure that out, but what you are proposing (0 base image, 100% overlay with masks present in both) -- I tried that, it did not work well for me, and I cannot figure out why it should. I will do some more homework here. Note, that in the final stage of removing the hot pixels, I do not do the composite transform twice, just the blur of the original image. Once I have the blurred image (as overlay), I run the composite transform only once to get the final image, with the mask associated with the input image and all sliders in their default places (100% white, 0% dark). Are you sure your composite transform was not left in the absolute difference mode when you were trying your slider settings? 4 -- You suggest modifications to the feathering, maybe even eliminating the need for this step if the prior ones are done better. Feathering produces no halos, I think. At least not in the sense of brightness variations around the places where the hot pixels are. The intent of the removal technique is to overlay each little section of the blurred image on top of the original where the original has hot pixels. So our final image is a little blurrier in a few places (how ever many hot pixels we have), but there should be little or no brightness artifacts produced, unless the hot pixel happens to fall right on an edge in the original. The more we feather, the larger the blurrier replacements get. It would be nice to get rid of the feathering step, but I have not found a robust way of avoiding it. If we set the lower control point of the brightness curve transform to pick up lighter pixels, then we not only make the hot pixels bigger, but we bring in more hot pixels. The feathering is an image dilation operation (in step mode) that seems better than a gaussian blur of the hot pixel mask, but I probably cannot defend why I think it is better. I wanted the mask to have reasonably sharp edges around each hot pixel. 5 -- Your final comment suggests the need for an overlay choice in the composite transform operation list. To me, the composite transform in blend mode IS basically an overlay operation, so I don't see how we need another choice in the Operation list. Double masking has the same effect as filtering a mask with itself before it is applied to either one of the mask slots, assuming all other controls are set at their defaults. In the composite transform, the mask to the right of the master amount slider is NOT applied to the original image, I think. Suppose for simplicity, we have a mask that has only black or white pixels. Putting the mask to the right of the master amount slider tells PWP to compute the transform according to how the remaining controls are set, but only for the white pixels in the mask. If the mask were placed to the right of the Overlay Amount slider in blend mode instead, it tells PWP to perform the overlay operation for the second image only where the pixels of the second image coincide with white pixels in the mask. In this simple case, either mask placement gives exactly the same result; in more complicated cases, I am not sure, and need to think about how to say what I think happens. Of course, Kiril and Jonathan know the answer -- maybe they can help. Thanks again for commenting -- it makes me think about what I did and why more carefully than I did originally. And I think you are right that starting with a dark frame, a single brightness curve transform gets you 99% of the way there for 99% of the usual circumstances, thereby bypassing the averaging and median blurring steps of the tutorial. I will update the tutorial appropriately after I think how to say it without making the whole thing more confusing instead of less confusing. Bob | ||
Kevin Elliott Member Username: Kevgermany Post Number: 485 Registered: 09-2004 |
Bob, I'm really not sure about the feathering, will try some examples tonight if I get chance. My intention was to create a black/white mask with no greys. As I understand it the mask/sliders in the composite transform should work the same way as in other transforms. i.e. as default nothing comes through from black, everything comes through from white, with varying amounts between. The sliders modify that, so that setting the black slider to 100% and the white slider to 0 reverses the behaviour. afik blend in composite does not overlay (i.e. exclude what's underneath, but applies an averaging algorithm to each pixel, so that the result is a combination of top and bottom layers. I checked quite a few of the methods in the operation box - seemed to be the same problem. With a B/W mask (no grey) what I was trying to do was take the good pixels from the base layer/original image, and replace the bad pixels with ones from the blurred image. So 100% black 0% white for the base, 100% white and 0% black for the blurred overlay. By using the same mask we'd get a 1:1 replacement. However, try as I might I couldn't stop the stuck pixels from coming through - even by setting black and white sliders on the base image to 0% - this should give nothing of the base image in the final result. I then substituted a white layer for the overlay image and achieved the same result. Hence my comments about the sliders. I'm sure a few more guys will chip in, be good to get their input before updating. | ||
David J. Bookbinder Member Username: Dbookbinder Post Number: 278 Registered: 09-2002 |
Perhaps Kiril, while he is looking at using the .badpixels feature of DCRAW, can come up with a way to fix bad pixels in JPEGs, too. What's really needed is a way to identify the pixels (which can be done with a dark frame image converted to a mask) and then use the algorithm in the Speck Removal tool to remove them all at once. One way to implement this in the current PWP user interface would be to add, to the Composite transform, a Speck Removal filter. This would call the Speck Removal tool to act on the pixels identified by the mask as hot. My two cents, David | ||
Bob Walker Member Username: Rwalkernm Post Number: 73 Registered: 06-2004 |
Kevin, Now I understand how you are thinking about the composite transform. But I think it's different. The name "Blend" for the composite operation is a misnomer, and "Overlay" is a better word for it. Look at this screen shot: 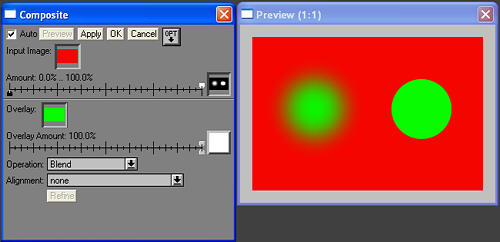 With sliders set the way they are, the green overlay image replaces the red base image, rather than being averaged with it (which would give a brownish result). Note the mask used here has two large "hot pixels", one with a fuzzy edge and another with a sharp edge. The behavior you are describing is the way "Stack Images" works. See this screen shot and slider positions. 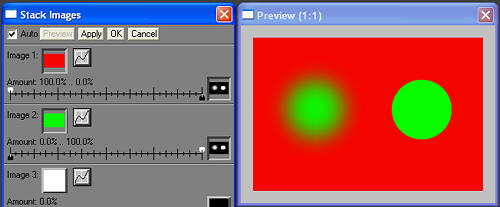 You can use the Stack Images transform with sliders set the way you describe and achieve the same result as the composite transform the way I set them. Does this look right to you? Thanks, Bob | ||
Kevin Elliott Member Username: Kevgermany Post Number: 487 Registered: 09-2004 |
Bob, thanks for being patient with me. I read the manual after reading your posts. I didn't understand the transform properly. My sliders work as per the manual. So do the masks. Blend does combine the images according to the slider settings. Had a close look at the blur, my version isn't really strong enough. However I really like David's idea as well as the overlay. Took a look at stack, that blends as well. | ||
Kevin Elliott Member Username: Kevgermany Post Number: 490 Registered: 09-2004 |
Jonathan/Kiril, please delete my last post - a couple of typos make it misleading. Should read: What I should have said last night (it was very late) is that using a mask only on the overlay, with the top amount slider set to 100% and on the bottom slider black at 0% and white at 100% in blend mode overlays the hot pixels, so no need for an overlay operation either. Agree your comments about stack. | ||
Bob Walker Member Username: Rwalkernm Post Number: 75 Registered: 06-2004 |
I have updated the tutorial that I started with this thread, based on some excellent suggestions and observations that Kevin Elliot made. The old link will continue to work, until I remove the old tutorial, but the new tutorial is at this URL: http://www.pbase.com/rwalkernm/hotpix2 The new tutorial has been expanded a bit, reorganized, and has been streamlined by eliminating and combining some steps. There is also a lot more explanation of why transforms were chosen the way they were. As always, please send many any feedback, either by email or leave notes on the pbase site. Thanks, Bob |